Oh man, this makes me want a garage! I think it’s a great idea, if you have the space .. and go through a lot of dog kibble like I do. The trick would to ensure you install it in a DRY environment, or it could be a cesspool for mold growth.
Here’s a great tutorial I found for all of you tool-capable pet people. It looks easy enough, and would make a great weekend project.

Pet food dispenser in action —
Slide open the “blast gate” and food falls into the dish. A hinged top allows easy refilling.
![]()
- Fig. D: Dispenser Details
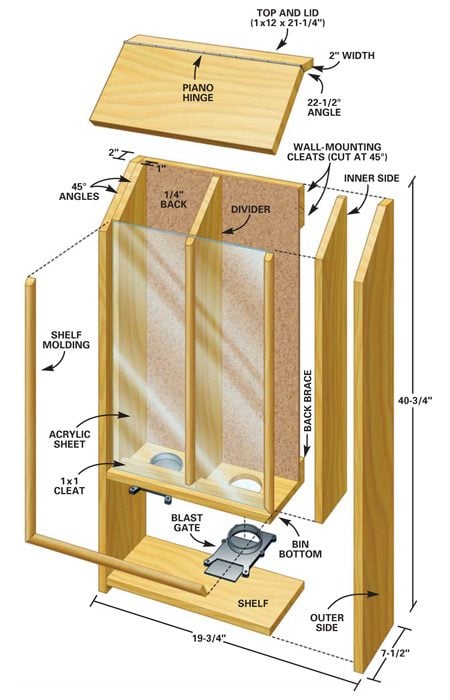
Figure D: Project Materials and Details
You’ll find most materials at a home center or lumberyard. We used 3/4-in. clear aspen, because it’s straight, soft and easy to work with. You can save a bit by building it out of No. 2 pine boards. If possible, buy the 18 x 24 in. acrylic sheet already cut to size. To cut it without chipping it, you’ll need a fine-tooth blade and a table saw.
“Blast gates” make handy food dispensers. Woodworkers use them for dust collection systems, so they’re readily available at woodworking shops or by mail order. Get the metal ones—the plastic ones don’t slide as well. These gates do have limitations. Medium- to large-sized food works best; they can jam with small stuff like birdseed. If the gate jams, quickly open and close it firmly.
Note: To see a complete Materials List and a Cutting List for this project go to the Additional Information at the end of this article. You can download Figure D from the Additional Information at the end of this article. Then enlarge it to the size you need.
Step 1: Cut out all the parts
Photo 1: Begin by cutting all the parts
Set your saw to an angle and rip the lid (22-1/2 degrees) and mounting cleat (45 degrees). Clamp or screw the boards to your workbench and use a straight guide for these cuts. Cut the other parts to length using a speed square as a guide to keep the cuts square.

Photo 2: Cut holes for the blast gates
Lay out the bays on the bin bottom using Fig. D as a guide. Find the center of each bay and draw the circular cutout for the blast gates with a compass. Drill a 5/8-in. starter hole and cut out the openings with a jigsaw.

Follow the photos for step-by-step directions. Cut the parts to the dimensions given in Cutting List in the Additional Information.
Step 2: Assemble the box
Photo 3: Mount the blast gates
Mount the blast gates in the openings. Replace the bolts that hold the two sides of the blast gate together with four 1-in. No. 6 wood screws. Don’t overtighten or you’ll pinch the gate closed. (Note: We also drilled a 3/8-in. hole to recess a little nub and bolt in the top of our blast gate.)

Photo 4: Glue the two-piece sides
Glue and screw the two-piece sides together (Fig. D). Use 1-1/4 in. screws and predrill with a 1/8-in. bit to avoid splitting the wood.

Photo 5: Assemble the box
Predrill and screw the center divider to the bin bottom with 2-1/4 in. trim head screws. Then add the sides, bottom, and top. Next attach the back and the top half of the cleat with 1-1/4 in. screws.

Follow the directions shown in Photos 3-5. Getting the blast gates to slide easily might take a little trial and error (Photo 3). Tighten or loosen the wood screws as needed to get them to work smoothly.
Step 3: Mount the acrylic front and hang the box
Photo 6: Mount the acrylic
Set acrylic in place, leaving 1/8-in. gap on all sides for expansion. Cut and fit the moldings (Fig. D). Nail the sides and bottom moldings to the bin with 3d finish nails, sandwiching the acrylic in place. Set the center molding and predrill 1/16-in. nail holes through both the molding and acrylic.

Photo 7: Enlarge the acrylic screw holes
Remove the center molding and enlarge the hole in the acrylic with a 1/4-in. bit to provide room for expansion. Press the drill gently so the bit doesn’t grab and crack the acrylic. Replace the molding and nail it on. Cut the piano hinge to length and screw it to the top.

Photo 8: Hang the dispenser
Level and screw the other half of the mounting cleat to the wall with four 2-1/2 in. screws driven into the wall studs. Hang the cabinet on the interlocking mounting cleats.

The acrylic requires special handling. Leave extra room around it so it can expand and contract freely. Carefully nail the perimeter molding so the nails don’t nick the acrylic and crack it (Photo 7).
Most types of hinges will work to secure the lid. We selected a short piano hinge. Cut it to fit with a hacksaw. The cabinet hangs on the wall on a cleat cut to 45 degrees (Photo 8). The height of the cleat shown is perfect for a 6-ft. tall person to operate the gate. Lower or raise to fit your height.
Additional Information
- Figure A: Bin details
- Figure B: Bin cutting layout
- Bin cutting list
- Bin materials list
- Figure C: Cabinet details
- Cabinet Cutting List
- Cabinet materials list
- Figure D: Dispenser details
- Dispenser cutting list
- Dispenser materials list
Find the original instructions on the Family Handyman website.


